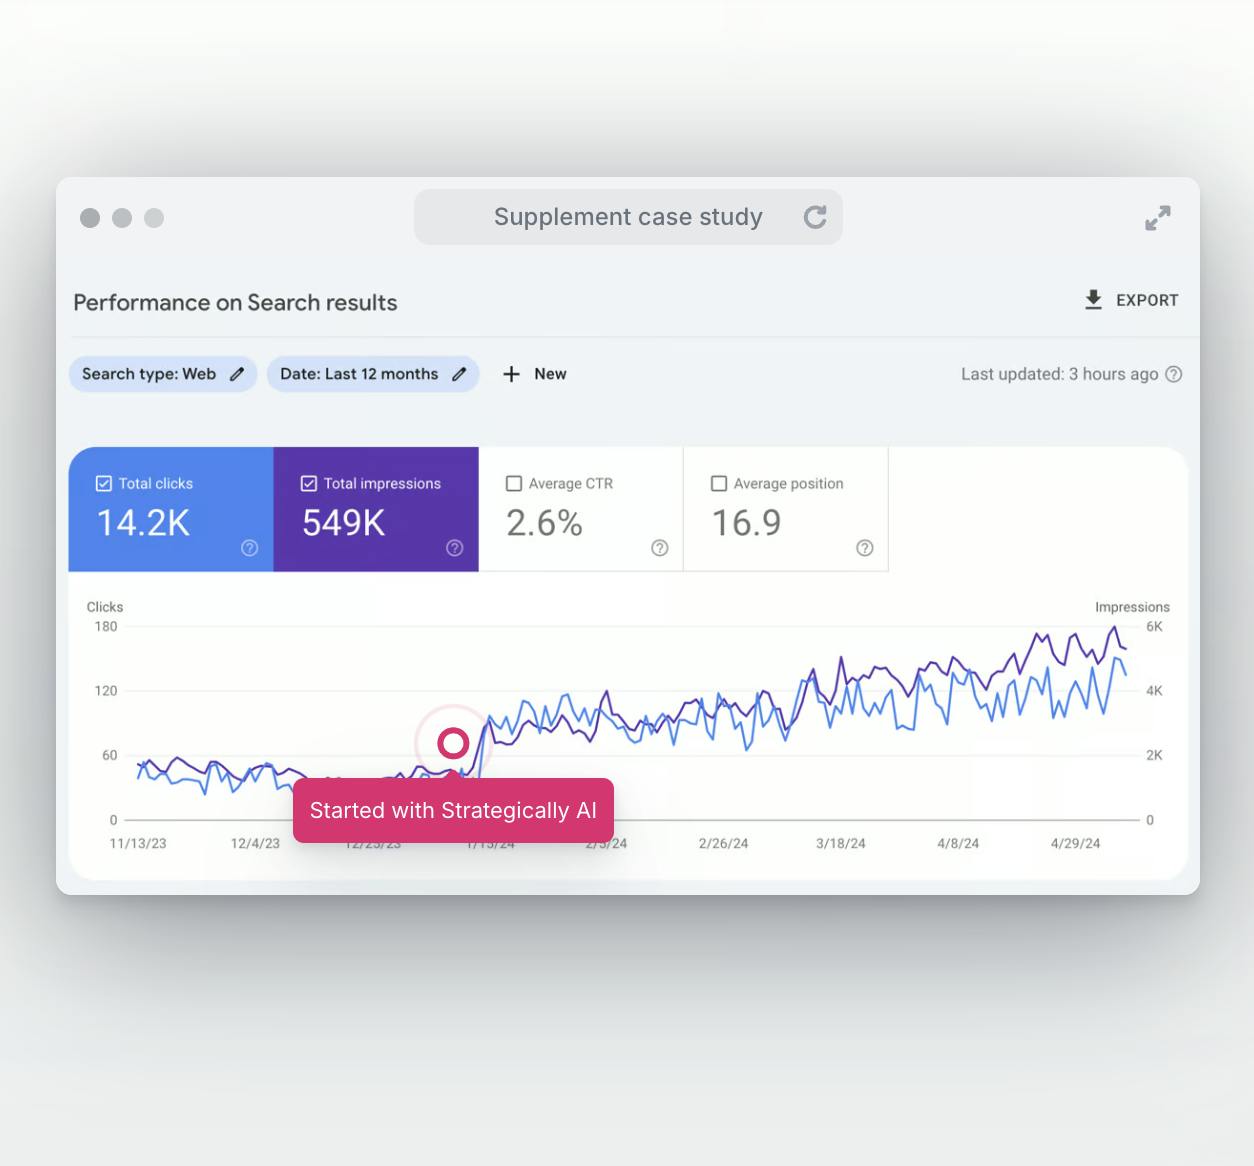
Today I'm going to show you how to create a blog post outline.
In fact, we use the exact process our content writing agency uses with more than 250 clients, writing in excess of 100,000 words per week.
So if you want a tried and tested way to create outlines for your blogs, keep reading.
Ready. Let's dive right in.
Do you need a blog outline?
You've got your blog idea.
You're the expert in your field.
You have all the knowledge already.
You're raring to go.
Do you really need to slow the flow by researching and preparing an outline?
It's a good question.
The short answer is yes, a blog post outline will help you create an article that engages your readers and pleases the Google bots.
As an industry expert, you may have all the knowledge to write a great blog. But, the key to writing a 10x blog post is to ensure that you include content your readers care about and people search for.
A blog outline combines keyword research, competitor analysis, and a spot of old fashioned research to make sure your blog content is killer.
It will also reduce time downstream as when you're ready to hit pen to paper (fingers to keyboard or voice to dictation), you've done all the time-consuming research, and you're free to focus on writing.

The benefits of a full blog post outline template are:
It streamlines your thoughts
Unless you're a content writing ninja, the idea or ideas for an article may come to you in a jumble of thoughts over days or weeks. A blog post outline helps you organise the maze of thoughts into a concise plan that makes sense to the reader.
It keeps you on the straight and narrow
If you're writing about something you feel passionate about, you might find your mind wandering or ideas constantly popping into your head. Without a clear blog post outline, you might find the entire article meandering with your thoughts. An outline keeps your thoughts organised in a systematic flow.
Creates a logical structure
Planning your article outline well before you start writing enables you to create a rational structure for your reader. It should be easy for them to follow the flow of the article from the introduction to the body to the conclusion and CTA.
Meets your business goals
Arguably, every word written online should have a purpose that meets your business goals. You need to determine the article's goal, how it helps your business, and how that ties in with your customer's needs and wishes.
It helps your target audience
Tied to the benefit above, by preparing a detailed outline before you write, you can ensure the article will benefit the reader and that you solve their question or pain with the piece of content.
Speeds up the writing process
As you'll find out below, a comprehensive outline can include doing all the fiddly research for the blog before you write. It should consist of knowing what to include, where, and why. By the time you start writing, it should be easy peasy.
Meet your SEO goals
A well-thought-out blog post outline should consider your SEO strategy and the target keyword(s) you intend to target with the article. The headings should be written with target keywords in mind. This is just one part of SEO services.
The writing process: The 13 steps to a blog post outline
So now you know the benefits of creating a blog post outline, let's dig into the steps to create one. If you'd like some professional help, our blog writing services are a good choice (shameless plug alert).
Without further ado, let's get into the steps.
1 — Start with your personal knowledge
If you're writing a blog for your own company or the company you work for, it's highly likely that you already know about the topic. Use this knowledge as a jumping-off point for your outline.
For example, if you are a SaaS company for eCommerce stores and you are writing an article on how to set up your Shopify store, it's very likely you already have some ideas for what to include based on your own personal experience.
You could argue that this is enough to get started writing a blog, and if you get lucky, it could be. But to really knock your blog out of the park, you need to make sure you organise your thoughts into a cohesive, solid outline before starting to write.
It's time for a brain dump.

Begin writing by dumping all your ideas related to the topic into one document. It does not need to be neat and tidy at this point, this part of the process is to get everything out, and you can condense it later.
Going back to our Shopify example, my brain dump might look like this:
- Choose a theme
- Buy a theme
- Installation
- Get domain
- Choose products
- Images
- Copy for product pages
- Etc.
It's a really simple list or mind map of ideas that relate to the overall topic that you can use for inspiration throughout the rest of the process.
2 — Research competitor articles
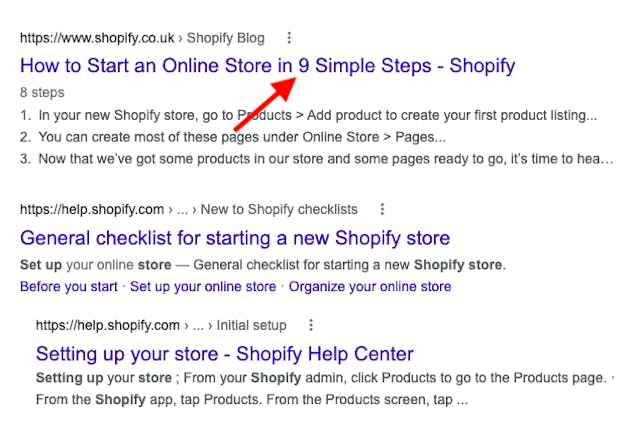
Now you've got the creative juices flowing, it's time to see what the competition is up to. Simply enter your blog post title idea and variations of it into Google and spend some time reading the top-ranked articles.
A quick review of the articles tells you what your competitors think is relevant to the topic and what the search engine intent is.
If Google is ranking how-to articles in the top spots, it's clear that people searching for "How to set up a Shopify store" want an actionable step-by-step process to help them. This may be an overly obvious example, but depending on your topic, it may not be so clear cut.
Take the topic HR interview questions. A quick search on Google shows that the reader is likely an HR professional buffing up on questions to use when interviewing candidates. But, what about people searching for interview questions for an HR job interview? The search term is likely the same, but the intent is very different.
Get this wrong, and you've written 4000 words on the wrong topic. Don't be that guy!
Competitor analysis of similar blog posts shows you what people expect to see when searching for your topic. It also shows you ideas for the blog's format (which we'll cover in more detail below), what the searcher hopes to gain from the blog, and what's ranking for similar terms.
It hopefully goes without saying, but it does not mean copying the article in the top spot :)
Once you've reviewed what's ranking and got article inspiration, you can think of ways to one-up what's out there. In other words, how can you make sure your article is better? Ask yourself:
- What's missing from the top-ranking articles?
- How can you improve on them?
- Can you add even more value to the reader?
Crack this, and you're well on the way to 10x content.
3 — Choose your blog format
After reviewing inspirational articles, you should have a clear idea of ranking and what matches the searcher's intent. You can now decide on the format for the blog. There are various formats, each perfect for a specific search engine optimization use case.
Here are some of the more common types:
- The How-To Post: A step-by-step guide to show the reader how to do something. It's a popular type because it forces the writer to show the reader how to do something, not just tell them. If you're a subject matter expert, this is a great blog post to get started with as it's easy to format, easy to write and involves limited research.
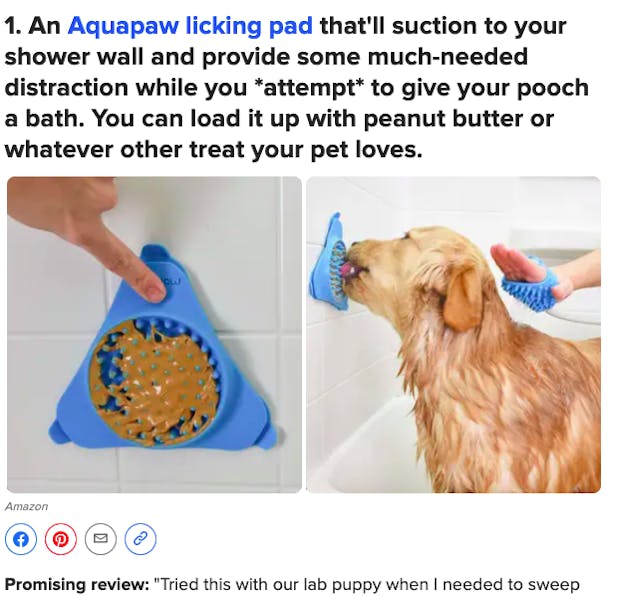
- The Listicle: This is a list-based article that can be quite image-heavy. Great for simple top ten posts. It's an easy-to-read and easy-to-write style but may not suit more technical topics.
- The Thought Leadership Post: Calling all experts! These articles are to showcase your talent and knowledge in your niche. Harder to outsource, as they can be quite personal and often based on opinion as opposed to fact.
- The Interview Post: Do you know some industry experts waiting to be interviewed? This is the blog type for you. It's great if you want to create original content, and it really shows your experience in your area.
- The Comparison Post: These articles are great if you have a great offering with features that can be compared to your competitors. Often used by SaaS brands, these vs blogs are a great way to subtly sell yourself and capitalise on the search for your competition.
4 — Target audience
The key to creating a blog post outline is to ensure that it is relevant images perfectly aligned with your target audience. If it's not relevant, at best, they'll bounce, and at worst, they won't even bother visiting your site.
You need to make sure you know exactly who you are speaking to. Otherwise, the blog is not relevant or interesting to your website visitors.
Let's revisit our fictional SaaS for eCommerce stores. Sure, you can assume your audience consists of wannabe or established eCommerce store owners, but don't stop there.
Take a moment to understand, for example:
- The demographics of your potential blog reader
- The income level of the Shopify store
- Whether it's only existing owners or if wannabes are relevant too
- Do they have tech knowledge?
- What location are they in?
- What problem are they trying to solve?
- Where are they on their buying journey?
It may seem like a lot, but if your app is only for Shopify Plus owners and you write a blog tailored towards a newbie Shopify owner, they won't be interested. It's just not valuable content to them.
A customer persona could look like this:
A hopeful eCommerce owner looking to set up Shopify. They need the app as it helps beginners get set up faster and reduces the costs associated with a new store. They are primarily located in the USA, have minimal tech experience, and are mostly 20-30-year-old females.

This clearly explains why they need the article (to help them get set up) and tells you that they need a beginner-level article with really easy-to-understand steps. The article and its outline should be easy-to-read and implement, even for beginners.
5 — Purpose of the article
Your content and content strategy should resonate with your target audience and meet your business goals. If it doesn't, it's wasting your time.
Ask yourself the following questions:
- What is the purpose of the article?
- What action would you like the reader to take?
- How does this article meet your business goals?
If your business goals are to increase freemium sign-ups of your app, how will the blog post help you achieve this? Or perhaps you want people to give you a call, does your next blog post formats tell the reader what to do?

It's important to consider that this doesn't mean that your article is a hard sell, far from it. But it does need to meet your needs. How does the blog post (subtly) push readers towards the action you desire? Does it answer your target customer's pain and reach them at the right point in their customer journey?
6 — Keyword research
A blog post outline should consider the available top search engines for keywords related to your topic. Not only is it a great way to optimise your article for SEO from the get-go, but it's also effective at ensuring your headings match the reader's interest.
Here's how to do keyword research to create a data-driven blog post outline.
First, take the topic "how to set up a Shopify store" and break it into smaller, highly relevant chunks, e.g. set up Shopify store or even just Shopify store. Enter this into Ahrefs Keyword explorer like this:
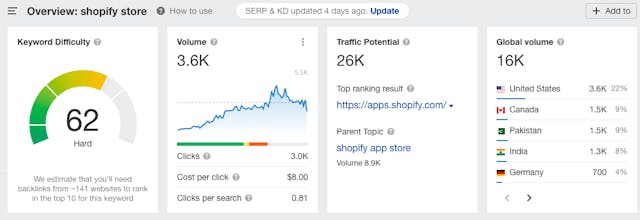
As you'd expect, the keyword Shopify store is highly competitive, although it has a ridiculous traffic potential. Sadly, unless you're Shopify, the chances of ranking for the term are non-existent. But, it's a good place to start our research.
Next, hit matching terms on the left-hand menu. This will show you ideas for groups of keywords that match the head term, like this:
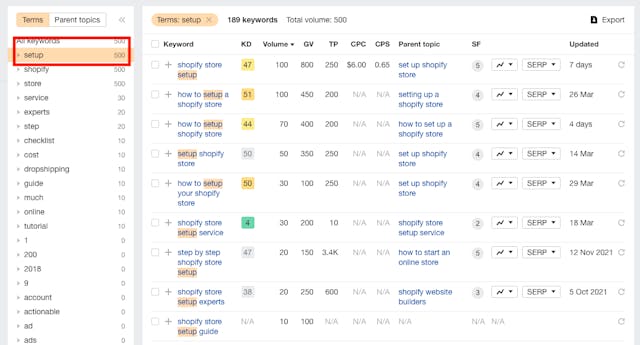
Here I can see the group of keywords related to Shopify store + setup. Although still competitive, I can begin to see some longer tail keywords such as how to set up a Shopify store that could be used in the outline.
If I go a step further and use a longer tail keyword, how to set up a Shopify store, I can see the competition is beginning to reduce, offering some interesting ideas for long-tail keywords that can be used as headings inside the article to inform the outline.
Looking at the screenshot below, an idea to explore for a section of the article might be the less competitive, longer-tail keyword how to set up a Shopify store for dropshipping.
7 — Start to narrow the focus
You should have a huge document with scribbles, notes, bullet points, and general ramblings if you've followed steps one to six.
If you're a mere mortal like the rest of us, it's not going to be pretty, and it's not going to be clearly organised, but you should have a really clear idea of the possibilities for the article.
It's time to organise your thoughts into a clearly-defined outline and entire process. If you've decided on a how-to guide, you need to determine the steps of the guide, as well as any context before or after the instructional part of the article.
Let's break this down a bit.
First, you need to consider how you will introduce the article. You don't want to start with a title and then immediately drop the reader into the step-by-step, so consider how you will introduce the topic and what context you need to include before the bulk of the article.
Second, you need to make sure that your content neatly answers the topic or title. You'd be surprised how often a writer writes a fantastic article but does not answer the topic at all. You also need to ensure that you're not going off on a tangent.
Check your subtopics are on point and clear out any ideas that are not relevant to the topic or do not add value to the user.
Third, you need to ensure that you answer the question in a logical flow from start to finish whilst incorporating all of the information you've undercovered in your research.
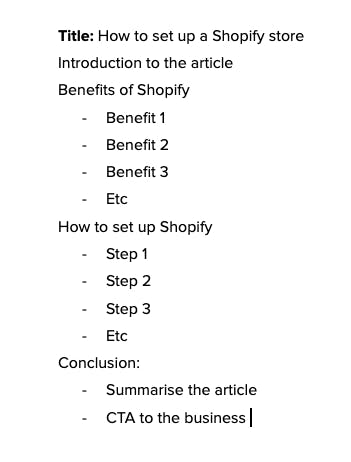
By now, you should have a simple bullet point outline to explain the article, something like this:
8 — Source your data
Depending on the type of article you are writing, it's probable that you will need to source some data to back up the arguments in your article. By including credible facts, data, and research, which are correctly sourced, you position yourself as an expert and prove your credibility.
Data could be as simple as statistics you source online, or it could be interviews with industry experts, original research or crowdsourced answers. It doesn't necessarily matter what you include, but it should be factual and add value to the reader.
Let's have a look at how this might work in real life.
If you are writing about the benefits of Shopify, a great way to add credibility to your article would be to add statistics proving the benefits of Shopify.
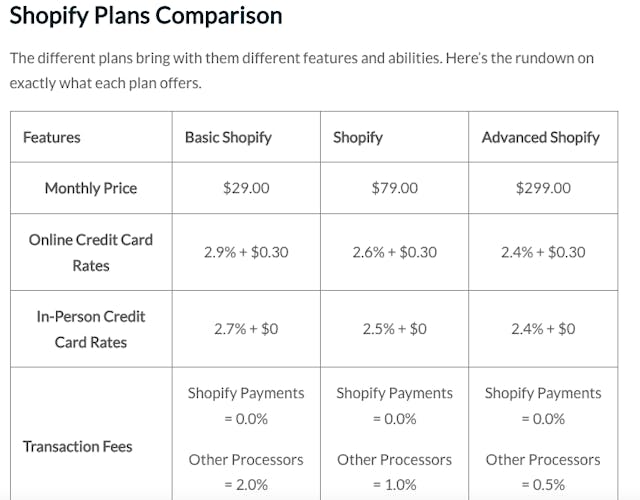
For example, you might know instinctively that Shopify is an affordable option for new website owners. But, if you don't provide pricing information, it's of little value to the reader. Consider adding an in-depth table outlining the prices for the various plans and features like this.
Check each section to see where data could add value during the outlining process. Then determine the best type of data to add. If you're going to create 10X content, now is the time to dig into the research.
Contact anyone in your network who could offer a soundbite, research industry social groups, or even set up your own survey. However, you plan to collect the data, by doing the legwork at this point in the process, by the time you get to writing, you won't have any blockers, and you can simply let the creative juices flow. You can thank me later :)
9 — Plan your intro and outro
These sections will depend on your business needs, target audience, blog format and other factors that we've covered above. But, like the last point, the more you decide upfront, the easier it is when it comes to actually writing.
Let's start at the beginning — the introduction. The introduction, arguably, is the most important part of the whole article. The best introductions are short and sweet, quickly convey your expertise in the area, and succinctly show how the blog will help the user.
It has to hook the reader and encourage them to continue reading. If it doesn't, your hard-earned website visitor bounces, you don't get a chance to position yourself as an expert, and you certainly don't convince them to visit the rest of your website.
On the other hand, the outro is your opportunity to tie the article into your offering. Once you've quickly summarised the article, you can subtly (oh so subtly) mention your service or product and how it perfectly aligns with the reader.
Add a link to your home or another relevant page, and boom, you expertly converted a blog reader to a website browser and potential future customer.
The key here is subtly. A blog is not the place to sell your service. It's a place to educate, inform, and build trust with your user. Being over-salesy will diminish any trust and immediately turn off casual readers.
10 - Structure your headings
After having written thousands of blog posts for clients, we cannot stress enough how important it is to correctly structure your headings. Not only is it highly important for your reader, but it also pleases the almighty Google gods.
A poorly structured article has little-to-no heading hierarchy. The headings are all the same, and there's no differentiation between them. In other words, every heading is H2 or even H1 on a poorly structured article.
A well-structured article groups content in larger headings and then smaller subsets within each heading. To do this, you need to determine your core areas of the article and then decide on the smaller points within each section.
Let's go back to our Shopify example. You've identified that you need to include the benefits of Shopify as a large section for the main points of the article. This heading, "The Benefits of Shopify", is an H2. You then need to split the actual benefits into H3 sections inside the higher level H2.
Here's how it could work in real-life:
- <H2>X benefits of Shopify
- <H3> Cheap to get started
- <H3> Does not need tech experience
- <H3> Lots of free themes
- <H3> Etc
Not only does this design look visually appealing on the page, but it also offers a clear and logical flow for the reader to follow.
For the best blog flow and formatting, make sure every blog post title has 1 - 4 sentences before the next heading. You do not want to leave two headings next to each other without some body copy in between.
11 — Internal links
All content should be written in line with a predefined content strategy. Every article, landing page, and product page should be designed to meet your SEO goals. And that includes internal linking.
Before you start writing, make sure you know exactly which pages this piece of content will link to — and why.
There's no point spending your limited time or money writing, installing, and SEO optimising content if it doesn't serve the business goals.
Once you've published your blog, you can also run a SurferSEO audit to find recommendations for internal links in order to achieve your goals. All it takes is a few quick steps:
- Enter the URL for the published blog into the audit tool in SurferSEO
- Run the audit and then scroll to Internal Links.
- Review Surfer's recommendations for links here.
12 — Nail your title
Like an intro, the title is core to making your article shine and, importantly, encouraging people to actually read it.
In fact, the stats show that 80% of people will read the headline, while only a meagre 20% actually read the blog.
Your title needs to encourage people to click on the article. It needs to answer the reader's pain and show value, all in less than 60 characters. Easy, right?!
Okay, it's not easy, but it's definitely important.
Read any number of blogs online, and you will get various opinions on what works. Here are a few ideas to get you started:
- Add numbers or data to the headline
- Create a unique and catchy headline
- Add a sense of urgency or FOMO
- Provide value and show the reader how the benefit from the blog
Whatever you opt to include, it's critical that the article speaks directly to the reader. There's no point calling it a Technical Guide to Shopify if you're writing a guide designed for a newbie. The title should speak to the right person.
Equally, the title must be representative of what's actually in the article. It's a waste of time calling it The Ultimate Guide to Shopify: Everything You Need to Know if it's only 500 words long. Common sense should avail here 🙂
13 — Choose your red lines
It's not technically part of your outline, but it's a handy part of the process to cover before you write. If you're writing a blog post for your own company or a company that you work for, it's likely that there are various red lines key stakeholders have.
These could be simple as not using a passive voice (this is very common) or more complicated such as specific words that can't be used due to competitor issues. It could be that the CEO is a stickler for capitalisation on certain words, or the CTO has a pet peeve for eCommerce spelt without the hyphen.
Whatever quirks your company has, get all stakeholders to agree on a checklist before you write. That way, before publishing, you can do a quick check and make sure everything's covered. You can also use this document to build upon, and if you have multiple writers or editors, you can all reference the article to keep the content in line with the business's tone.
It's over to you
Now you know the steps to creating a killer blog post outline.
By taking the time to prepare, you can dramatically reduce the time it takes to write the blog.
But, now, it's time for you to get writing.
Happy blogging :)
P.S. If the dreaded writer's block strikes, check out our writing services and see how we can help.

